


The creation, deployment, and management of available Kubernetes clusters for production environments is often a complex and time-consuming process. The tasks get even more complex when it is related to provisioning AWS resources. So looking at this challenge, Kubernetes kOps emerges as a valuable solution, it offers teams a simple and scalable approach to configure and manage production-grade clusters.
Before we start our journey with kOps, we will get into its fundamental aspects, explore key features, draw comparisons with other popular alternatives, and go through a practical example illustrating how to use kOps on AWS which will give us hands-on experience with the necessary insights and skills using this effective tool.
Development Level Environments of Kubernetes
Minikube
Kind
K3S
K3D
Micro k8S
Production Level Kubernetes Environments
EKS
AKS
GKE
Openshift
Rancher and so on
What is kOps?
Kops, short for Kubernetes Operations, is an open-source tool designed to simplify the process of creating, deploying, and managing Kubernetes clusters, particularly in production environments. It is the most widely used tool.
With kOps, we can automate the management of Kubernetes clusters as kOps can easily create, apply, and update cluster configurations.
Kubernetes kOps is supported by AWS Cloud, Google Cloud Platform, Microsoft Azure, Digital Ocean, etc.
Alternatives to kOps
kOps is not the only tool available for cluster management. There are several alternatives to kOps but kOps appears ahead of all the tools available. Some tools are:
Kubeadm - kubeadm does not support the provisioning of infrastructure.
Eksctl - Only supports AWS
kubespray - Kubespray does not support the provisioning of infrastructure
To set up a Kubernetes Cluster in AWS with kOps
Create an ec2 instance and install the following dependencies
Python3
AWS CLI
Kubectl
An active domain with a dedicated “kops” subdomain: For this demo, we will use .k8s.local
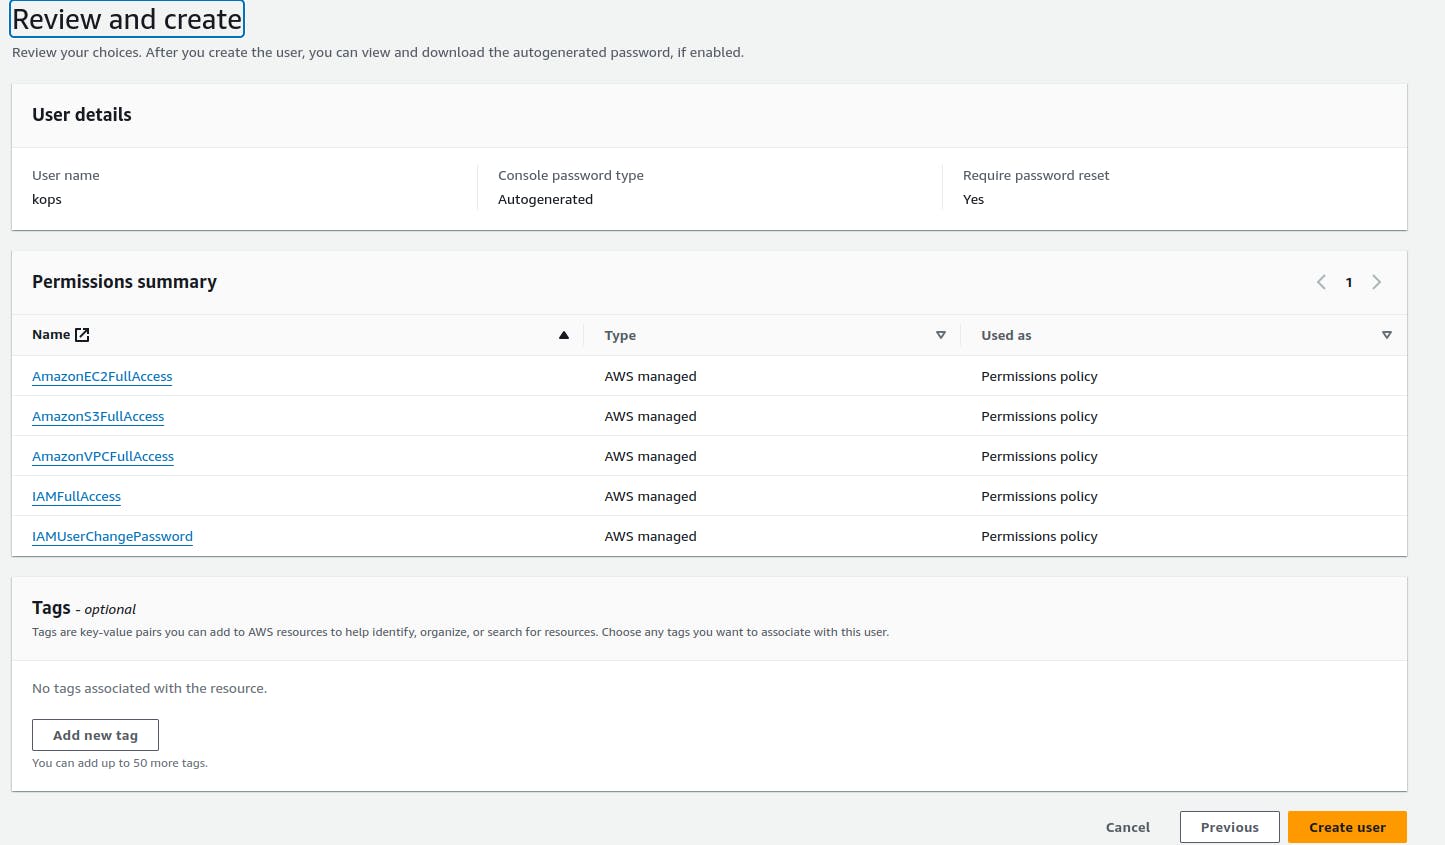
IAM user with below permissions
AmazonEC2FullAccess
AmazonS3FullAccess
IAMFullAccess
AmazonVPCFullAccess
Step 1: Create an IAM user called “kops” with the required permissions.
Note: If you are using the admin user, the below permissions are available by default
Now login as an IAM user i.e kops so that we will create the instance, and k8s clusters.

Once you log into your account, go to Security Credentials > generate the Access key and Secret key to configure AWS in CLI.
Step 2 Create an ec2 instance and access it using ssh protocol
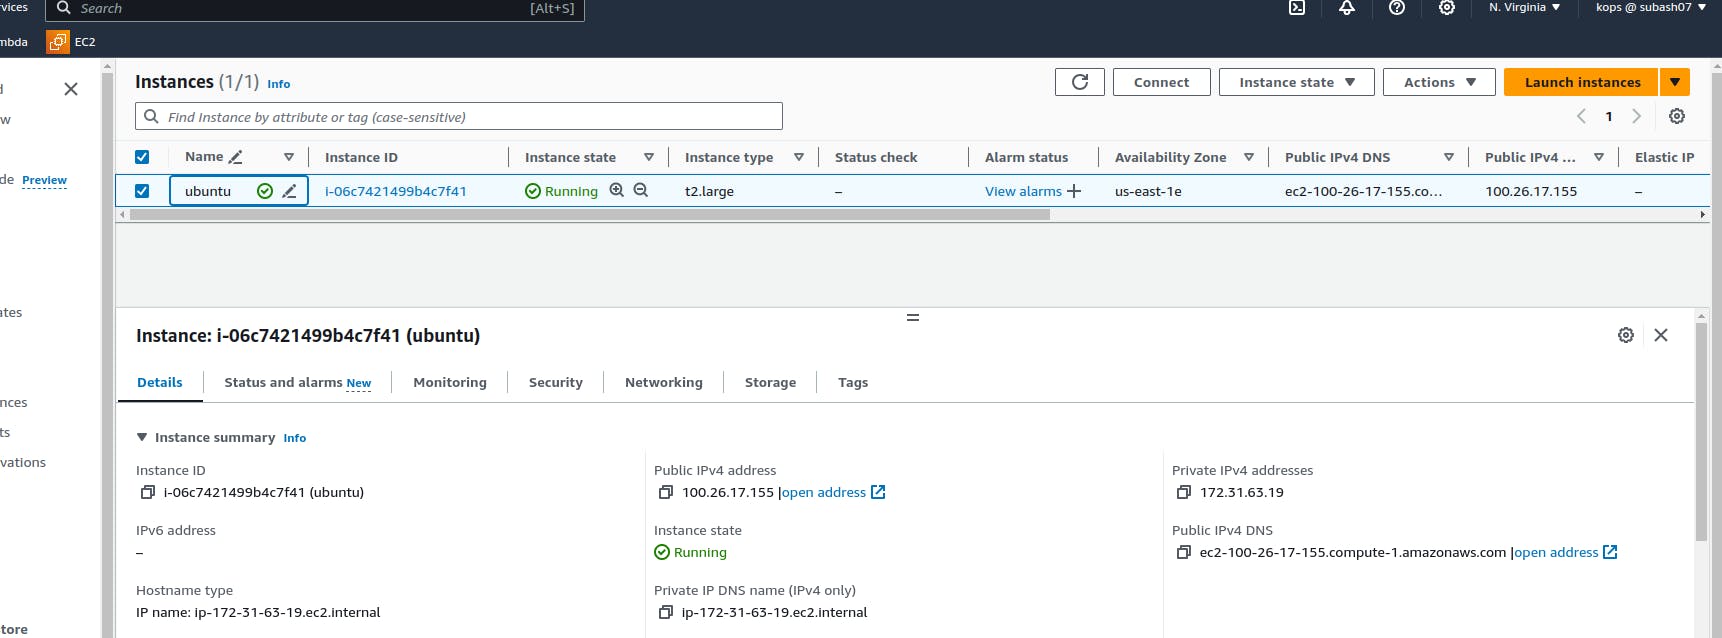

Once you are logged into the ec2 instance then RUn aws configure to verify user credentials.
Note: Update the instance and Install AWS CLI in the ec2 instance
sudo apt update
sudo apt install awscli
aws configure
Install dependencies
curl -s https://packages.cloud.google.com/apt/doc/apt-key.gpg | sudo apt-key add -
echo "deb https://apt.kubernetes.io/ kubernetes-xenial main" | sudo tee -a /etc/apt/sources.list.d/kubernetes.list
sudo apt-get update
sudo apt-get install -y python3-pip apt-transport-https kubectl
pip3 install awscli --upgrade
export PATH="$PATH:/home/ubuntu/.local/bin/"
Install kOPs
curl -LO https://github.com/kubernetes/kops/releases/download/$(curl -s https://api.github.com/repos/kubernetes/kops/releases/latest | grep tag_name | cut -d '"' -f 4)/kops-linux-amd64

chmod +x kops-linux-amd64

sudo mv kops-linux-amd64 /usr/local/bin/kops

kOps is installed successfully.
Kubernetes Cluster Installation
Create an S3 bucket for storing the KOPS objects
kOps stores its configurations, keys, and related items, in an S3 bucket to manage Kubernetes clusters. Therefore we need to create a dedicated S3 bucket for this purpose.
aws s3api create-bucket --bucket kops-subash-storage --region us-east-1

Verify it in AWS

Create the cluster
kops create cluster --name=demok8scluster.k8s.local --state=s3://kops-subash-storage --zones=us-east-1a --node-count=1 --node-size=t2.micro --master-size=t2.micro --master-volume-size=8 --node-volume-size=8
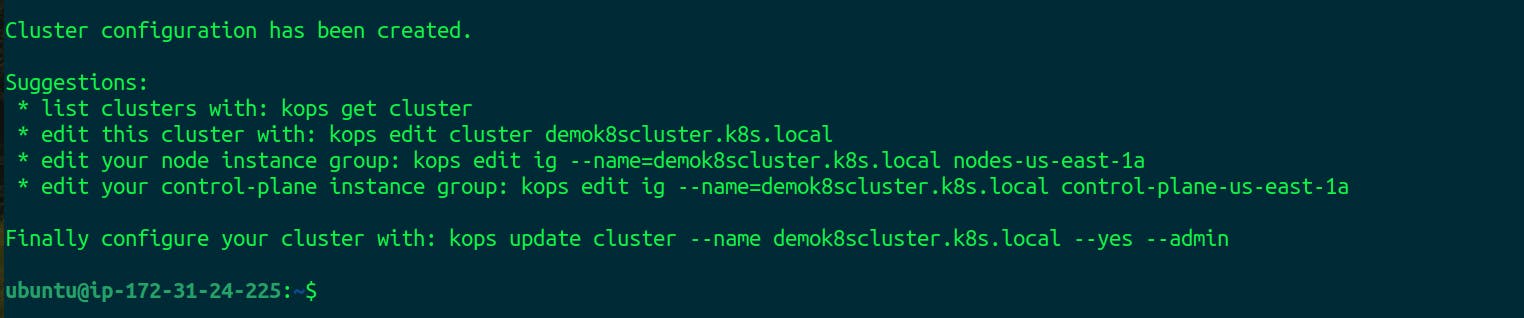
Here our Kubernetes cluster configuration is created but not started. So to start the Kubernetes cluster run the command
kops update cluster --name demok8scluster.k8s.local --yes --admin
Output:

Run the comand
kops validate cluster --wait 10m
Wait for about 10 minutes for the cluster to come up.
When the cluster is ready, you will see output similar to this:
Since I used t2.micrwhich has less storage and computing power we could not validate the configuration

But after running the command kops validate cluster --wait 10m clusters will be created.
To get nodes
kubectl get nodes
nodes:
Master node
worker node
Deploy a simple workload - nginx and expose it at port 80
kubectl create deployment my-nginx --image=nginx --replicas=1 --port=80
kubectl expose deployment my-nginx --port=80 --type=LoadBalancer
Verify Nginx is running
kubectl get pods
To get the load balancer details
kubectl get svc my-nginx
Earlier, we saw that kOps created one master and one node by default.
kops get instance group

Here, the instance group name ‘nodes-us-east-1a’ is for the node role. We can edit it and update the ‘maxSize’ and ‘minSize’ to values 3. First, open the editor with this command:
kops edit instancegroups nodes-us-east-1a
# Please edit the object below. Lines beginning with a '#' will be ignored,
# and an empty file will abort the edit. If an error occurs while saving this file will be
# reopened with the relevant failures.
#
apiVersion: kops.k8s.io/v1alpha2
kind: InstanceGroup
metadata:
  creationTimestamp: "2024-1-8T05:16:35Z"
  labels:
    kops.k8s.io/cluster: demok8scluster.k8s.local
  name: nodes-us-east-1a
spec:
  image: 099720109477/ubuntu/images/hvm-ssd/ubuntu-focal-20.04-amd64-server-20211118
  instanceMetadata:
    httpPutResponseHopLimit: 1
    httpTokens: required
  machineType: t3.medium
  maxSize: 3
  minSize: 3
  nodeLabels:
    kops.k8s.io/instancegroup: nodes-us-east-1a
  role: Node
  subnets:
 —us-east-1a
Save and quit the editor. Apply the changes by running:
kops update cluster --name demok8scluster.k8s.local --yes --admin
After a few minutes, you can verify that the node count is 3.
kubectl get nodes
Delete the demo cluster and resources
Since we're operating a Kubernetes cluster in AWS, it's crucial to be aware that the underlying infrastructures such as EC2 instances and LoadBalancers—incur costs. Therefore, it's important to remember to delete the cluster once we've completed the demo to avoid unnecessary expenses.
Execute the following commands to effectively delete both the resources and the cluster:
kubectl delete svc my-nginx
kubectl delete deploy my-nginx
kops delete cluster --name demok8scluster.k8s.local --yes
In this way, we can use kOps for the different operations in Kubernetes. Furthermore, to know about kops CLI usage use this link https://kops.sigs.k8s.io/cli/kops/
Therefore, kOps makes managing our Kubernetes cluster on AWS easy by automating the setup of necessary resources like instances and load balancers. It strikes a balance between control and simplicity, simplifying our cluster management tasks.
Thank you!!
Happy Learning!!